Recycling Old Crypto Miners - Nebra
Recycling Old Crypto Miners for Something Useful
Helium Coin spiked and crashed, leaving many $750+ miners useless. Rather than becoming e-waste, they can be repurposed for Meshtastic. The most practical model I’ve found is the Nebra Outdoor Hotspot Miner.
Though a Pi CM4 would be nice, cost, power and heat likely dictated the CM3. Waveshare does make a CM4-to-CM3 adapter if you need more processing horsepower but there’s already power issues with the Nebra. I’ve ordered other outdoor miners to test for easy conversions as well. So far Nebra is king of the hill.
Hardware Details
Each kit includes a 915 MHz 3 dBi antenna, a 2.4 GHz antenna, an aluminum enclosure, mounting hardware, a Pi CM3 board with USB WiFi and Bluetooth. Units are often found on eBay for about $50; if listed higher, try offering around that price. They need 12 VDC or PoE (12–15 W draw), which is too high for USB and not ideal for solar.
Mountain Mesh in Georgia offers accessories: Nebra Pi hats for 40-pin Pis, the MESHTOAD USB for any PC, and a still-prototypw PCI-E card. Join their Discord for details. The enclosure is a DAM005C from Ningbo Darer, claimed IP65/IP67, about $15–20 plus shipping. A schematic for enclosure is here.
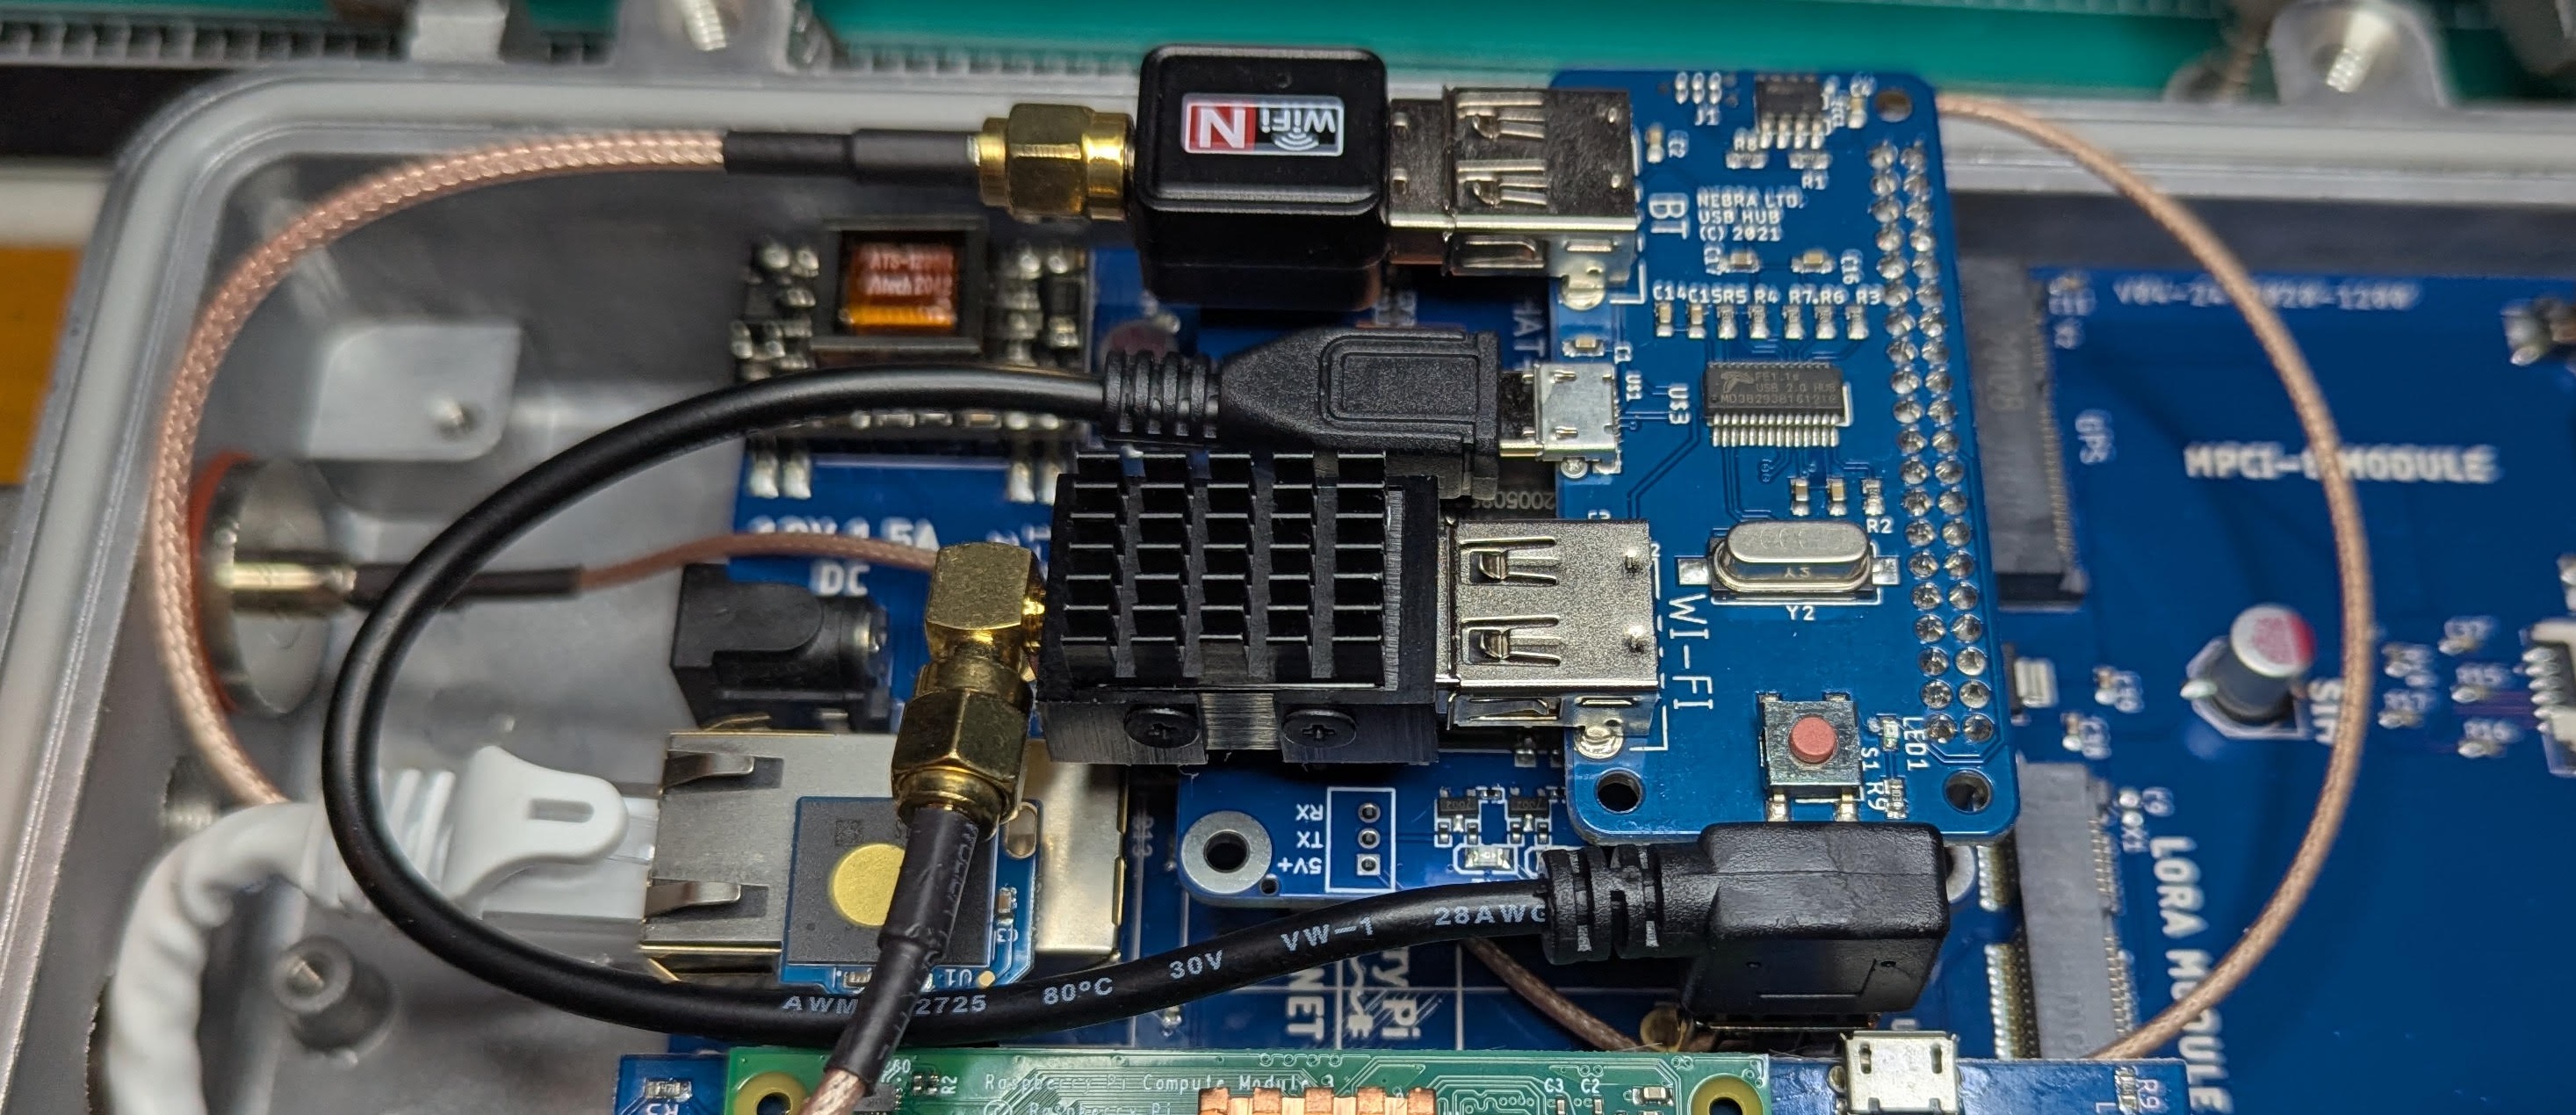
Shucking
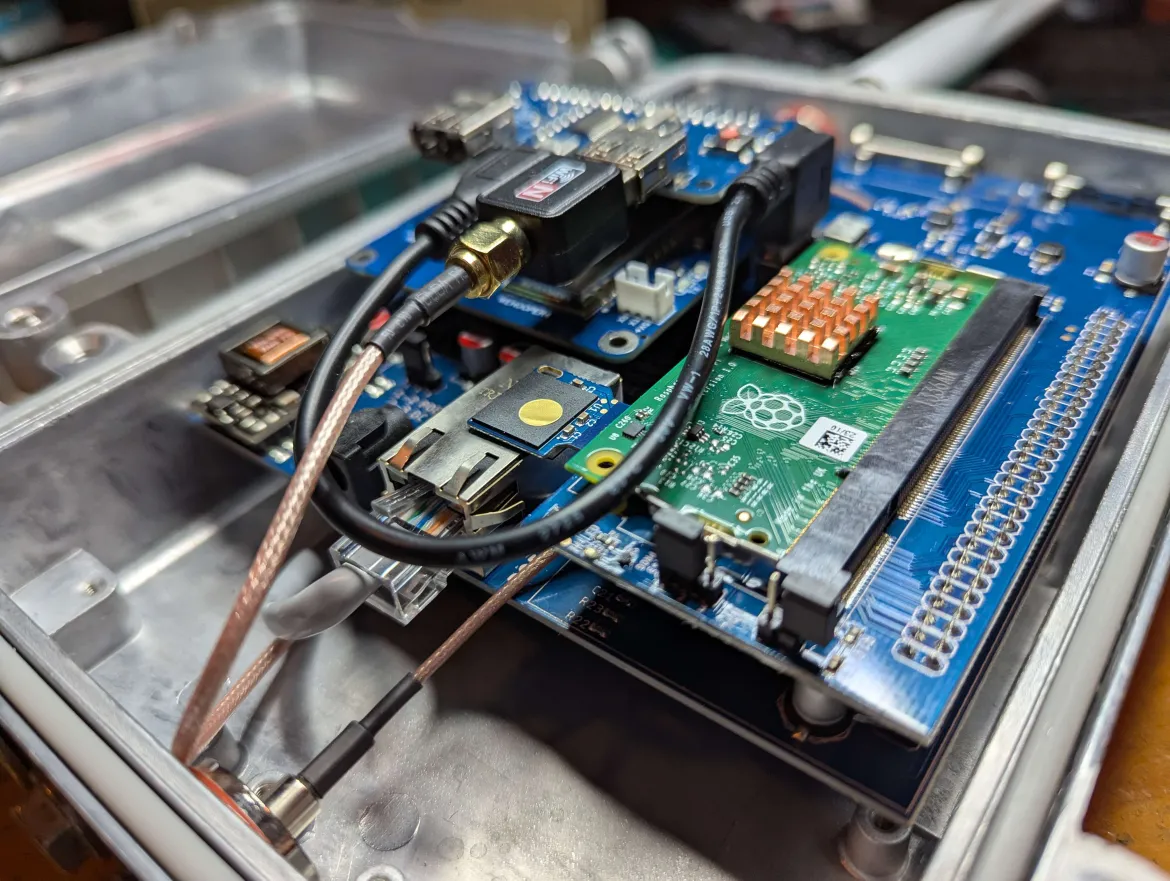
Remove the USB board if you don’t need it. The Bluetooth adapter has short range and no external antenna support, I believe it was only meant for initial setup. Keep WiFi and connect to the single USB port. Keep an eye on bulkhead thickness for board clearance. Mounting posts are all M3 pan head screws, buy M3 washers for grounding. Then attach the WeHooper Nebra hat to the 40-pin header or other meshtastic radio.
The eMMC module is a small ‘key’ with gold dot near the Pi board. It will work in a MicroSD slot. Adapter compatibility varies greatly; SanDisk SD card adapters don’t work, uGreen USB MicroSD adapter off Amazon work reliably. eMMC has much longer lifespan and operating temps, try not to use a MicroSD card for anything but testing or temp controlled environment.
There’s two ways of writing the OS:
Writing Debian Using Nebra Pi board
Still confirming. Looks like it runs much slower but more reliably. The two pin connector tells the board to either be in programming mode or operating mode. The three pin connector is flashing firmware or writing to SD/eMMC card, I believe.
- Remove Nebra Pi board from Nebra, remove Micro-USB cable
- Download and install Raspberry Pi USB Boot before anything else
- There are two sets of jumpers on Nebra Pi board right next to the CM3. Leave 3 pin connector alone if already on Pins 2 and 3 (. On 2 pin connector, switch from not jumped to jumped
- Plug in USB cable to PC and Pi board
- Run rpi-boot-CM-CM2-CM3
- Run Pi Imager
- Once done, unjump 2 pin connector! Will not work unless unjumpered. Plug back into nebra, leave 3 pin alone.
Writing Debian MicroSD adapter method
- Remove eMMC key, put in MicroSD slot or adapter
- Fire up Raspberry Pi Imager.
- First button: Pi 3 (Nebra uses a Compute Module 3 (CM3) which is in the small text)
- Second button: Go with Lite 64 bit, less running services
- Third button: should come up with 32GB option, select that.
Once you’re done, hit the bottom right button to start. You’ll get a prompt about settings. Go ahead and edit settings. Set hostname, WiFi, account, sshd, etc etc. Otherwise you won’t be able to log into your Pi afterwards. Reinstall the module, power up, and SSH in. To find your new node, do a port scan or check your router for the DHCP entry.
To install Meshtastic:
# New system updates
sudo apt update -y
sudo DEBIAN_FRONTEND=noninteractive \
apt-get -y \
  -o Dpkg::Options::="--force-confdef" \
  -o Dpkg::Options::="--force-confold" \
  dist-upgrade
# Meshtastic install
echo 'deb http://download.opensuse.org/repositories/network:/Meshtastic:/beta/Debian_13/ /' | sudo tee /etc/apt/sources.list.d/network:Meshtastic:beta.list
curl -fsSL https://download.opensuse.org/repositories/network:Meshtastic:beta/Debian_13/Release.key | gpg --dearmor | sudo tee /etc/apt/trusted.gpg.d/network_Meshtastic_beta.gpg > /dev/null
sudo apt update -y
sudo apt install meshtasticd i2c-tools -y
sudo apt install pipx -y && pipx install "meshtastic[cli]"
pipx ensurepath
sudo nano /boot/firmware/config.txt

# add or uncomment these lines
#dtparam=i2c_arm=on
#dtparam=spi=on
#dtoverlay=spi0-0cs

# Turns on auto-discovery
sudo apt install avahi-daemon

sudo tee /etc/avahi/services/meshtastic.service > /dev/null <<'EOF'
<?xml version="1.0" standalone="no"?><!--*-nxml-*-->
<!DOCTYPE service-group SYSTEM "avahi-service.dtd">
<service-group>
    <name>Meshtastic</name>
    <service protocol="ipv4">
        <type>_meshtastic._tcp</type>
        <port>4403</port>
    </service>
</service-group>
EOF

sudo systemctl enable avahi-daemon && sudo systemctl start avahi-daemon


# Rename hostname, set for DNS
sudo hostnamectl set-hostname KD3BQB-NodeXX
sudo systemctl restart avahi-daemon
# sudo nano /etc/hosts

# if ZebraHat, enable i2c via this
#sudo raspi-config

# Meshtastic CLI
meshtastic --host --set lora.region "US"
meshtastic --host --set-owner "SUSQ VAL PA Mesh - Town - Tower"
meshtastic --host --set-owner-short "SVMI"
meshtastic --host  --export-config | grep "Key:"
Enable SPI in /boot/firmware/config.txt and ensure dtoverlay=spi0-0cs is present. Optionally enable I2C via dtparam=i2c_arm=on and install i2c-tools. Reboot, then download the correct hat config:
# Documentation at https://github.com/wehooper4/meshtastic-Hardware/tree/main/NebraHat

# Get YAML
# sudo wget –O /etc/meshtasticd/config.d/NebraHat_1W.yaml https://github.com/wehooper4/meshtastic-Hardware/raw/refs/heads/main/NebraHat/NebraHat_1W.yaml
sudo wget -O /etc/meshtasticd/config.d/NebraHat_2W.yaml https://github.com/wehooper4/meshtastic-Hardware/raw/refs/heads/main/NebraHat/NebraHat_2W.yaml
# sudo wget -O /etc/meshtasticd/config.d/NebraHat_Duo_E22P.yaml https://raw.githubusercontent.com/wehooper4/Meshtastic-Hardware/refs/heads/main/NebraHat/Duo/NebraHat_Duo_E22P.yaml
#sudo wget –O /etc/meshtasticd/config.d/ZebraHat.yaml https://raw.githubusercontent.com/wehooper4/Meshtastic-Hardware/refs/heads/main/ZebraHAT/ZebraHat.yaml


# Edit YAML
#sudo nano /etc/meshtasticd/config.d/NebraHat_1W.yaml
sudo nano /etc/meshtasticd/config.d/NebraHat_2W.yaml
#sudo nano /etc/meshtasticd/config.d/NebraHat_Duo_E22P.yaml
#sudo nano /etc/meshtasticd/config.d/ZebraHat.yaml

# If 2W, verify power level is set to 8 or lower. 4 is recommended due to 5v rail sag, and is NOT cutting your TX power in half.
# Obviously change 2W to 1W if purchased that model.

# Edit Meshtasticd Config
# If you have problems below such as "No sx1262 radio", try uncommenting the CS line
sudo nano /etc/meshtasticd/config.yaml

# Fire up meshtasticd
sudo systemctl enable meshtasticd && sudo systemctl start meshtasticd
Edit config.yaml to set MAC (use MACAddressSource eth0) and node limits (200-400). Troubleshoot with journalctl -xeu meshtasticd.service or run meshtasticd manually. Configure through the Meshtastic app. Use the Network option on the Cloud tab in the app.
Sensors and GPS

If using I2C sensors, enable I2C by uncommenting their lines in both /boot/firmware/config.txt and /etc/meshtasticd/config.yaml. Check devices with i2cdetect -y 1
Some miners include a NEO-6M GPS chip, which is nice. If absent, adding surface mount parts is possible but often a USB GPS or cell modem is easier. I spoke with the developer of the Nebra board. The pin allocation on the hat header is because he wanted to leave UART0 available on 14/15. To enable onboard NEO-6M GPS:
sudo apt install gpsd gpsd-clients chrony socat -y
sudo nano /boot/firmware/config.txt
# Add to end of file:
# enable_uart=1
# dtoverlay=uart1,txd1_pin=32,rxd1_pin=33,pin_func=7
#sudo raspi-config   # Select (3) serial interface -> I6 Serial Port -> disable shell serial console -> enable serial hardware
sudo raspi-config nonint do_serial_hw 0 # Enable Serial Port (enable_uart=1)
sudo raspi-config nonint do_serial_cons 1 # Disable Serial Console
sudo nano /etc/default/gpsd
# DEVICES="/dev/serial1"
sudo nano /etc/chrony/chrony.conf
# # Use gpsd as a time source
# refclock SHM 0 refid GPS precision 1e-1 offset 0.0 delay 0.2
sudo systemctl restart chrony
sudo reboot

# check sats
cgps -s
# Once you have satellite lock, check and see if you're getting GPS time data
chronyc sources -v
Update /etc/default/gpsd with DEVICES=”/dev/serial1” and add /dev/serial1 to the Meshtastic GPS: section of config.yaml.
Grounding

Critical if placed on a tower, especially with RF equipment.
Rip out the USB board, Pi CM3 board and main board. Shuck a $12 Ubiquiti ETH-SP-G2 Surge Protector. Pry it out with a multi-tool, bending the case a bit is fine. It is not meant to stop a lightning strike. It’s meant to ensure Ethernet pins potential vs the local enclosure ground never exceeds 90-100v and preventing surges/transient power. ETH-SP-G2 does want to stick up a bit. Screw unit to a post with M3 pan head screw and washer, use a cheap flathead screwdriver as a chisel, give it some light taps until closer to the floor of the case. Put some silicone tape on top, to prevent ground shorts from the system board.
Use Noalox on aluminum wiring points, helps prevent oxidation.
Use 12AWG solid core grounding wire, crimped (not soldered) to a ring terminator. Check with your tower owner if heavier gauge wire is needed. Use one of the M10 cable gland. It’s pretty good match for the 12AWG wire.
Put a lightning arrestor on the main antenna. Connect both wires with a split bolt and then to tower ground using ground clamp. Notion is to provide a low-impedance path to ground.
Cell Modem
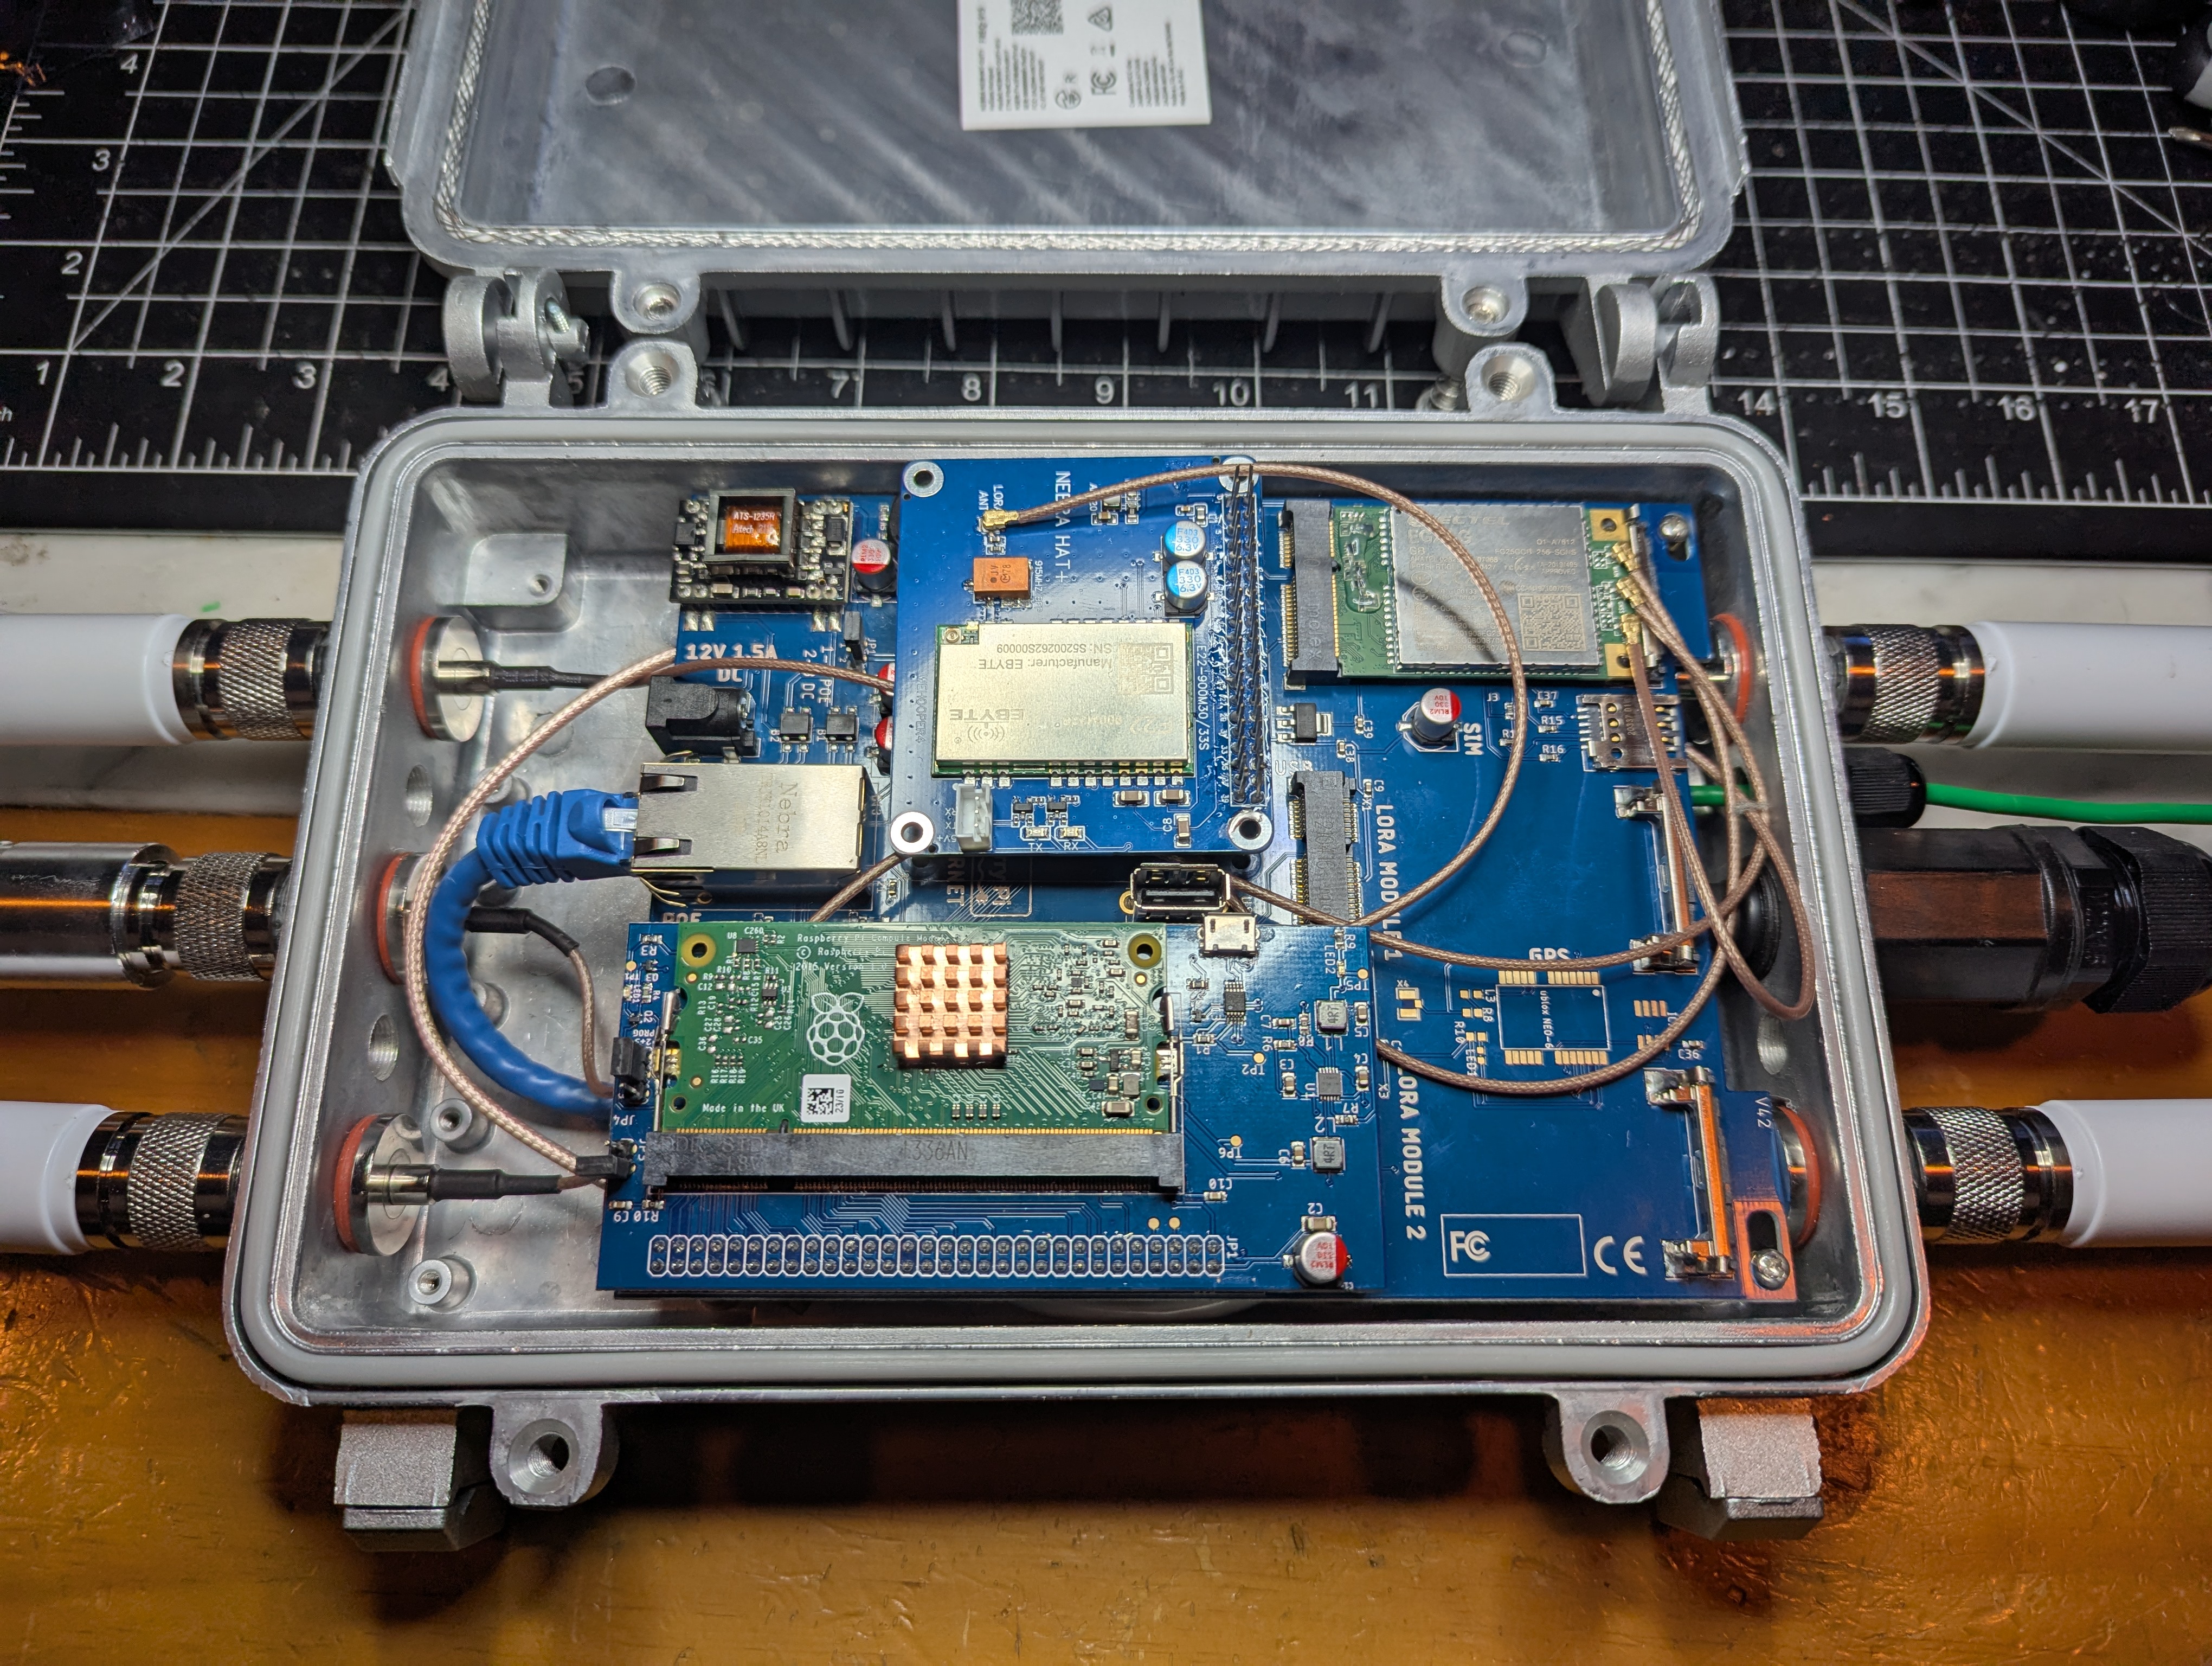
For remote access, see the Quectel EG25-G Mini PCIe guide.
This LTE PCI-E card supports multiple GNSS constellations and quite a few useful features. Use MAIN only for Meshtastic to avoid interference. Use other LTE antenna for GPS, it works fine. The EG25-G requires a SIM; eSIM is possible but complex. GPS performance was good even indoors. Keep LTE and LoRa antennas separated on opposite sides of the case.
WiFi AP
Buy a new WiFi dongle that includes native linux support and AP mode. Included one has driver issues, and is kinda nightmare.
Adding WiFi network manually
sudo nmcli connection add type wifi ifname wlan0 con-name mywifi ssid "SSID_NAME"
sudo nmcli connection modify mywifi wifi-sec.key-mgmt wpa-psk
sudo nmcli connection modify mywifi wifi-sec.psk "YOUR_PASSWORD"
sudo nmcli connection modify mywifi connection.autoconnect yes
Setting up AP mode
Save to setup-ap.sh and run sudo bash ./setup-ap.sh
#!/bin/bash
# Simple AP setup script for Debian
# Run as root

### CONFIGURATION ###
AP_SSID="MyAccessPoint"
AP_PASSWORD="SuperSecret123"
WLAN_IF="wlan0"
AP_IP="192.168.50.1"
DHCP_RANGE_START="192.168.50.10"
DHCP_RANGE_END="192.168.50.200"
UPLINK_IF="eth0"   # or wwan0 if you want to NAT to LTE
####################

set -e

echo "[*] Installing required packages..."
sudo apt -o Acquire::ForceIPv4=true update
sudo apt -o Acquire::ForceIPv4=true install -y hostapd dnsmasq iptables-persistent ifupdown

echo "[*] Stopping services until configured..."
systemctl stop hostapd || true
systemctl stop dnsmasq || true

echo "[*] Configuring static IP on $WLAN_IF..."
cat >/etc/network/interfaces.d/$WLAN_IF <<EOF
auto $WLAN_IF
iface $WLAN_IF inet static
    address $AP_IP
    netmask 255.255.255.0
EOF
ifdown $WLAN_IF || true
ifup $WLAN_IF

echo "[*] Configuring dnsmasq..."
mv /etc/dnsmasq.conf /etc/dnsmasq.conf.orig.$(date +%s) || true
cat >/etc/dnsmasq.conf <<EOF
interface=$WLAN_IF
dhcp-range=$DHCP_RANGE_START,$DHCP_RANGE_END,255.255.255.0,24h
EOF

echo "[*] Configuring hostapd..."
cat >/etc/hostapd/hostapd.conf <<EOF
interface=$WLAN_IF
driver=nl80211
ssid=$AP_SSID
hw_mode=g
channel=6
wmm_enabled=1
auth_algs=1
ignore_broadcast_ssid=0
wpa=2
wpa_passphrase=$AP_PASSWORD
wpa_key_mgmt=WPA-PSK
rsn_pairwise=CCMP
EOF

# Point hostapd to config
sed -i "s|^#DAEMON_CONF=.*|DAEMON_CONF=\"/etc/hostapd/hostapd.conf\"|" /etc/default/hostapd

echo "[*] Enabling IP forwarding..."
sed -i 's/^#\?net.ipv4.ip_forward.*/net.ipv4.ip_forward=1/' /etc/sysctl.conf
sysctl -p

echo "[*] Setting up NAT to $UPLINK_IF..."
iptables -t nat -A POSTROUTING -o $UPLINK_IF -j MASQUERADE
iptables -A FORWARD -i $UPLINK_IF -o $WLAN_IF -m state --state RELATED,ESTABLISHED -j ACCEPT
iptables -A FORWARD -i $WLAN_IF -o $UPLINK_IF -j ACCEPT
netfilter-persistent save

echo "[*] Enabling services..."
systemctl unmask hostapd
systemctl enable hostapd
systemctl enable dnsmasq
systemctl restart hostapd
systemctl restart dnsmasq

echo "[+] Access Point setup complete!"
echo "    SSID: $AP_SSID"
echo "    Password: $AP_PASSWORD"
echo "    Interface: $WLAN_IF ($AP_IP)"
Antenna Selection
Stock antenna is decent at alleged 3dBi. RAK sells similiarly decent generic antennas. See https://github.com/meshtastic/antenna-reports
Do not focus on just SWR. If you hooked up a 50 Ω resistor to your NanoVNA, Thanos would be happy that it perfectly balanced but it won’t radiate RF well. SWR tells you how well your antenna matches your transmitter, not antenna performance. High SWR does mean wasted battery and poor range, but low SWR doesn’t guarantee good transmitting or efficiency. To do that, hook up the antenna and take measurements at different distance and angle.
Gain is not magic. It’s not adding power, it’s shaping it. 0dBi would be a very fat (theoretical and idealized isotropic radiator) donut, handy if you want good coverage in all directions equally. 9dBi would be a very wide but thin pancake, handy if you put on a tower and want to reach other towers. 3-6dBi is compromising between the two.
Higher gain flattens the vertical beam, turning the donut into a wider, thinner pancake. There is no ideal, only ideal for your purpose.
If you want all-purpose coverage from a single mountaintop node, 5 dBi, ISM-tuned is the sweet spot. It won’t be great at distance, but it won’t leave nearby hikers without coverage either. Incidentally these tend to be expensive antennas.
If you want all-purchase coverage in an urban or suburban environment, 3 dBi would probably be a better choice.
Now let’s make things even more complicated. It’s not JUST the dBi. That shapes the power, but how do we get the power in the first place?
With commercial high quality fiberglass omnidirectional antennas, you’re paying the extra for lower conduction/dielectric loss (ohmic heating in conductors, dielectric materials, radome, etc.). High-quality commercial fiberglass omnis often have radiation efficiency >90–95% (loss <0.5 dB). Cheap eBay/Amazon antennas can be much worse — sometimes only 30–60% efficiency. Meaning if you’re beaming a watt, you might only be shooting out 300-600 milliwatts for that antenna to shape.
SWR tells you what fraction of power even makes it into the antenna. Efficiency tells you how much of that delivered power is actually radiated vs lost as heat. Together, they give you real radiated efficiency.
Let’s suppose you have a great antenna with SWR of 1.5, you’ll get a reflection ~4% of TX power and 92.5% antenna efficiency, ~88% of the original watt is radiated. Meaning you get around 0.88W transmitted.
Increase the SWR to 2, you’ll get a reflection ~11% of TX power and 92.5% antenna efficiency, ~82% of the original watt is radiated. Meaning you get around 0.82W transmitted.
Suppose you want to add coax instead of mounting your antenna to the ipex bulkhead. 1dB of feedline loss can cost you 20.6% of the watt before it even gets to your expensive commercial antenna. Taking that awesome 0.88W down to 0.71W.
Reliability
To auto-restart Meshtastic and reboot weekly:
sudo tee /usr/local/bin/check_meshtasticd.sh > /dev/null <<'EOF'
#!/bin/bash
SERVICE="meshtasticd"
if ! pgrep -x "$SERVICE" > /dev/null; then
    echo "$(date): $SERVICE not running, restarting..." >> /var/log/meshtasticd_monitor.log
    systemctl restart $SERVICE
fi
EOF
sudo chmod +x /usr/local/bin/check_meshtasticd.sh
sudo crontab -e
# 0 * * * * /usr/local/bin/check_meshtasticd.sh
# 0 1 * * 1 /sbin/reboot
If you’re not very experienced with Linux, remember to log in every so often to run updates. You can automate that as well.
Remote Access
sudo nano /etc/modprobe.d/ipv6.conf
## Don't load ipv6 by default
#alias net-pf-10 off
#alias ipv6 off

curl -fsSL https://tailscale.com/install.sh | sh
sudo tailscale up
Copy URL to web browser.
Once you have tailscale installed, you can also install tailscale on your phone and use the Meshtastic app to connect to your node from anywhere in the world.
Software Defined Radio (SDR)
I installed a NooElec NESDR Nano 3 in several Nebra nodes. Notion is in high difficulty radio frequency environments, it can help look at what’s happening on the spectrum. Running meshtasticd and SDR software at the same time may make the Pi CM3 struggle, but we’ll see how it goes.
# Install apps
sudo apt update
sudo apt install -y rtl-sdr rtl-433 soapyremote-server

# should see: Bus 001 Device 004: ID 0bda:2838 Realtek Semiconductor Corp. RTL2838 DVB-T
lsusb | grep RTL2838

sudo tee /etc/udev/rules.d/20-rtl-sdr.rules > /dev/null <<'EOF'
# NooElec NESDR / RTL2832U SDR dongles
SUBSYSTEM=="usb", ATTRS{idVendor}=="0bda", ATTRS{idProduct}=="2838", MODE="0666", GROUP="plugdev"
EOF
sudo udevadm control --reload-rules
sudo udevadm trigger
sudo usermod -aG plugdev $USER

# test SDR
rtl_test -t

# Test capture
rtl_sdr -s 2048000 -f 100e6 -n 2048000 /tmp/fm.iq

# run SDR server
rtl_tcp -a 0.0.0.0 -p 1234
# soapyremote-server
Optionally you may want to blacklist the old drivers
echo "blacklist dvb_usb_rtl28xxu
blacklist rtl2832
blacklist rtl2830" | sudo tee /etc/modprobe.d/blacklist-rtlsdr.conf
sudo update-initramfs -u
sudo reboot
lsmod | grep rtl
You should not see dvb_usb_rtl28xxu, rtl2832, or rtl2830. Your SDR software (rtl_test, rtl_tcp, etc.) should now directly claim the dongle without conflict.
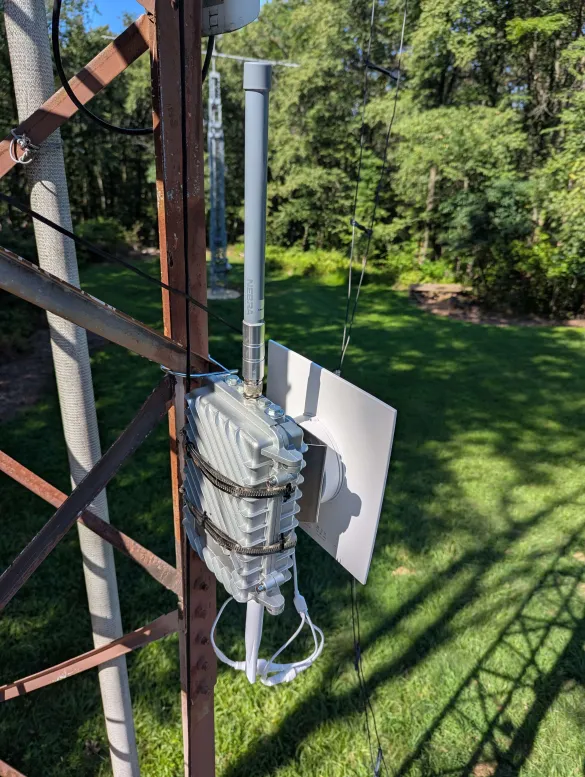
Prepping Miner for Outdoor Deployment
- The stock antenna is usable but can be upgraded.
- Wrap threads with telfon tape.
- Wrap all bulkheads with electrical tape, silicon tape, and then another layer of electrical tape.
- Alternatively you can use marine shrink tube or butyl tape like CoaxSeal
- Fit the EMI rope gasket into the upper lid, trim to fit.
- Use surge protection at both ends; put a shucked ETH-SP-G2 in the case and connect another cased ETH-SP-G2 to grounding rod or common tower ground.
- Use lightning arrestor between 915 MHz antenna and N bulkhead, crimp on grounding cable with enough slack.
- Use M10 port and M10 cable glands for case grounding wire, connect internal shucked ETH-SP-G2 and case grounding lug with one wire and leave enough of a tail to connect.
- Use split bolts to connect all grounding lines.
Power consumption
This assumes running off 12v barrel connector:
Running idle: 4.3 Watts
TX: 4.8 Watts
Boot-up: 8 Watts
ssh and meshtasticd: 6.x Watts
Still need to do POE power check as well
BOM
| Item | Description | Min Cost | Qty | UOM | Optional | Vendor |
|---|---|---|---|---|---|---|
| Nebra | Enclosure, antennas, etc | $40 - $60 | 1 | Ea | No | eBay |
| Pi Hat | NebraHat | $30 - $60 | 1 | Ea | No | Discord |
| Stacking headers | Allowing more than one hat | $10.00 | 1 | Lot | Yes | Amazon |
| Grounding wire | 12 AWG solid, THW PVC | $15.00 | 1 | Spool | No | Amazon |
| Grounding lug | Works for alum/copper | $2.28 | 1 | 2 pack | No | Home Depot |
| Split Bolt | Copper split bolt | $5.23 | 1 | 2 pack | No | Home Depot |
| Surge protector | Gas discharge tubes | $12.50 | 2 | Ea | No | UBTN |
| N-Male to N-Male Adapter | For aftermarket antenna | $10.00 | 1 | 2 pack | Yes | Amazon |
| Antenna | Antenna upgrade | $50.00 | 1 | Ea | Yes | eBay |
| u-Green SD Reader | Flashing eMMC key | $8.00 | 1 | Ea | Yes | Amazon |
| Waterproof Vent Plug | Allows air and moisture out | $3.00 | 1 | Ea | Yes | AliExpress |
| WiFi | Included Wifi is terrible | $6.00 | 1 | Ea | Yes | AliExpress |
Basic build can run as low as $100 if good priced Nebra, basic 1W hat and 2 surge protectors. Or up to $200 if needing to purchase a lot of ancillary or high end components.
Deployment Lessons Learned
- Ground test your node on site.
- Spares for literally everything. Anything you will NEED, have at least one or two spares.
- You will lose nuts, bolts and U-bolts. Have a baggie of the tower bits for your installer. Stuff will be dropped. Have extra zip ties.
- Test your cables, test your POE injector
- Have lots of different grounding options
- Have a spare fully operational node when doing a tower install. Troubleshooting is time intensive compared to direct swap
- Ground test your rig for at least a week
- Pre-program a WiFi link for the location. In a pinch, set your phone HotSpot to that WiFi network or have your laptop be able to form an Access Point
- Have the tailscale app on your phone. It near instantly tells you when node is online. Plus you can switch from WiFi to cell to verify outside access
- Copy the private and admin keys in advanced so you can remotely reprogram your node via another node
Consider tapping your N antenna ports with a 5/8”-24 UNEF RH tap. The threads are rough by default. Screw in the tap by hand as much as possible. Only switch to the wrench once you hit resistance and have the tap well seated. Ideally you shouldn’t need the wrench at all. Some cutting fluid, machine oil or lube on the tap would be a good idea but don’t need a lot. If you don’t have any, skip.
The Power of the Sun!
If you got your Nebra and don’t want to muck around with configuring a Pi or 12VDC/POE, you can just use the enclosure for a solar node.
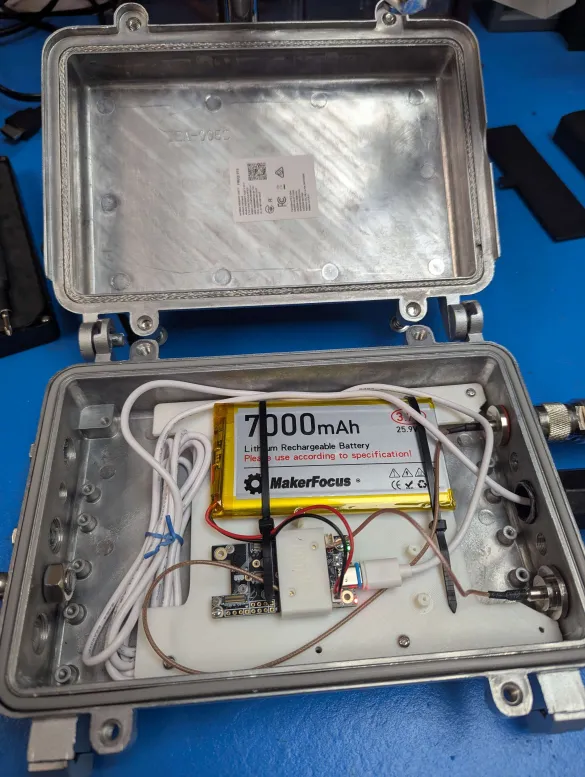
For solar, strip the case and mount a WisBlock. A printed mounting plate works; PETG is ok but ASA is best. Use a 3000 mAh bag battery or even a single 18650. Short IPEX cables on the bulkheads minimize loss, you only have 0.15W TX to play with, but can reuse included bulkheads to save money. A pigtail bracket holds connectors in place. Use #2 screws. 2.4 GHz WiFi antenna works fine for Bluetooth on the Wisblock
BE VERY CAREFUL WITH THE BATTERY WIRING, YOU CAN EASILY FRY THE BOARD IF THE WIRING IS REVERSED. Verify the + marking on the battery, and the + next to the battery connector. Do not rely on wire color.
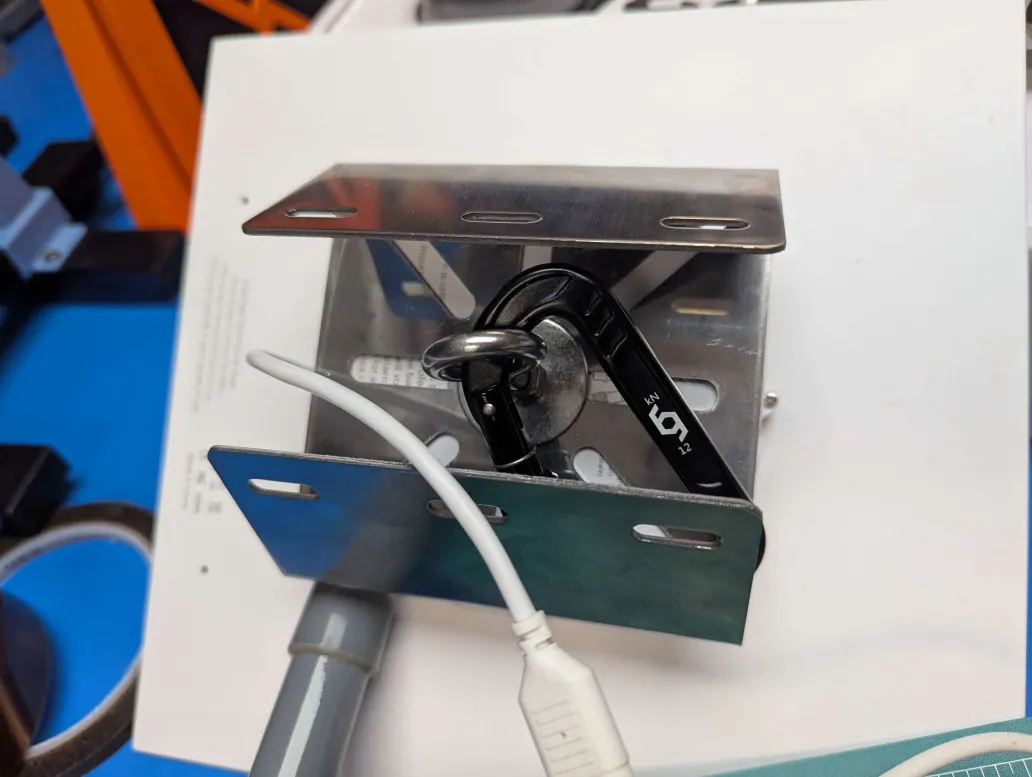
I use a mounting bracket to connect the solar panel to the miner, along with metal hose clamp. The solar panel I had used a 1/4 in course threaded nut. The hose clamp are probably the most secure way to fasten the two together. One honestly is fine, and trim slack.
I wrap the solar panel line connectors with silicon tape, plus the bulkheads. As well as spiral wrap for air hoses, to hopefully keep wildlife from eating the external power cable.