
Install Swagger UI on IIS for Infor IQM / Mongoose
Intro
Swagger UI is a graphical interface for swagger rather than just a JSON file. You can also run demo API requests directly from the browser. Lets you prototype much faster and easier.
It just static HTML and Javascript, so nearly zero overhead. Has no impact on your production system.
This guide:
- Does not change the IQM/Mongoose binaries, app pool, or web.config
- Adds a virtual directory (or app) that serves only static content
- Points Swagger UI at your Mongoose OpenAPI endpoints (e.g.,
/IDORequestService/ido/api-docs/)
Prerequisites
- See last IQM posts on tokens, setup, finding IDO names, etc.
- Windows Server with IIS and Static Content feature enabled
- An IQM/Mongoose instance reachable at a URL like:
- Generic docs index:
http://<host>/IDORequestService/ido/api-docs/ - REST v2 (if generated via REST API Wizard):
http://<host>/IDORequestService/ido/api-docs/v2/(index)
http://<host>/IDORequestService/ido/api-docs/v2/<IDOName>(per-IDO)
- Generic docs index:
- RDP access and admin rights to the IQM IIS server
Tip
If/api-docs/v2/returns 404 but/api-docs/works, run the REST API Wizard in Mongoose to generate the typed REST v2 endpoints. Once generated, their Swagger becomes available under/api-docs/v2/.
Quick Test (optional)
From the IQM server (PowerShell):
$urls = @(
  "http://<host>/IDORequestService/ido/api-docs/",
  "http://<host>/IDORequestService/ido/api-docs/v2/"
)
$urls | % { try { "{0} -> {1}" -f $_,(Invoke-WebRequest $_ -UseBasicParsing -TimeoutSec 5).StatusCode } catch { "{0} -> FAILED: {1}" -f $_,$_.Exception.Message } }
Step 1 — Download Swagger UI
- Grab the latest Swagger UI release ZIP from the official repo.
- Extract the contents of the
distfolder to a new path on the server, for example:
C:\inetpub\wwwroot\swaggerui
Your folder should contain files like index.html, swagger-initializer.js, swagger-ui.css, etc.
Do NOT put in your IQM folder.
Step 2 — Point Swagger UI at Mongoose API Docs
Edit C:\inetpub\wwwroot\swaggerui\swagger-initializer.js.
You have two options:
Option A — Single spec URL
Do this first. Try Option B later unless you know what you’re doing.
Replace the default config with:
window.ui = SwaggerUIBundle({
  url: "http://<host>/IDORequestService/ido/api-docs/",
  dom_id: '#swagger-ui',
  deepLinking: true,
  presets: [
    SwaggerUIBundle.presets.apis,
    SwaggerUIStandalonePreset
  ],
  layout: "StandaloneLayout"
});
Option B — Multiple specs (dropdown)
Let users switch between the generic index and specific REST v2 IDOs:
window.ui = SwaggerUIBundle({
  urls: [
    { url: "http://<host>/IDORequestService/ido/api-docs/", name: "Mongoose API Docs (Index)" },
    { url: "http://<host>/IDORequestService/ido/api-docs/v2/VQUnits",  name: "VQUnits (REST v2)" },
    { url: "http://<host>/IDORequestService/ido/api-docs/v2/VQSpecs",  name: "VQSpecs (REST v2)" },
    { url: "http://<host>/IDORequestService/ido/api-docs/v2/VQInspections", name: "VQInspections (REST v2)" }
  ],
  dom_id: '#swagger-ui',
  deepLinking: true,
  presets: [
    SwaggerUIBundle.presets.apis,
    SwaggerUIStandalonePreset
  ],
  layout: "StandaloneLayout"
});
Tip
If you don’t know the exact IDO names, start with the index (/api-docs/or/api-docs/v2/) and follow links from there.
Step 3 — Create the IIS Virtual Directory
- Open IIS Manager.
- In Connections, expand Sites → select the site that hosts IQM.
- Right-click the site → Add Virtual Directory…
- Alias:
swaggerui - Physical path:
C:\inetpub\wwwroot\swaggerui
- Alias:
- Click OK.
Convert to Application
- Select the new
swaggeruiitem. - Right-click → Convert to Application…
- Use the same app pool as the parent site (static files only), or create a new app pool for isolation.
- Click OK.
Ensure Static Content is enabled
On the server node → Modules/Features → verify Static Content is installed.
No custom handlers are required—Swagger UI is HTML/JS/CSS.
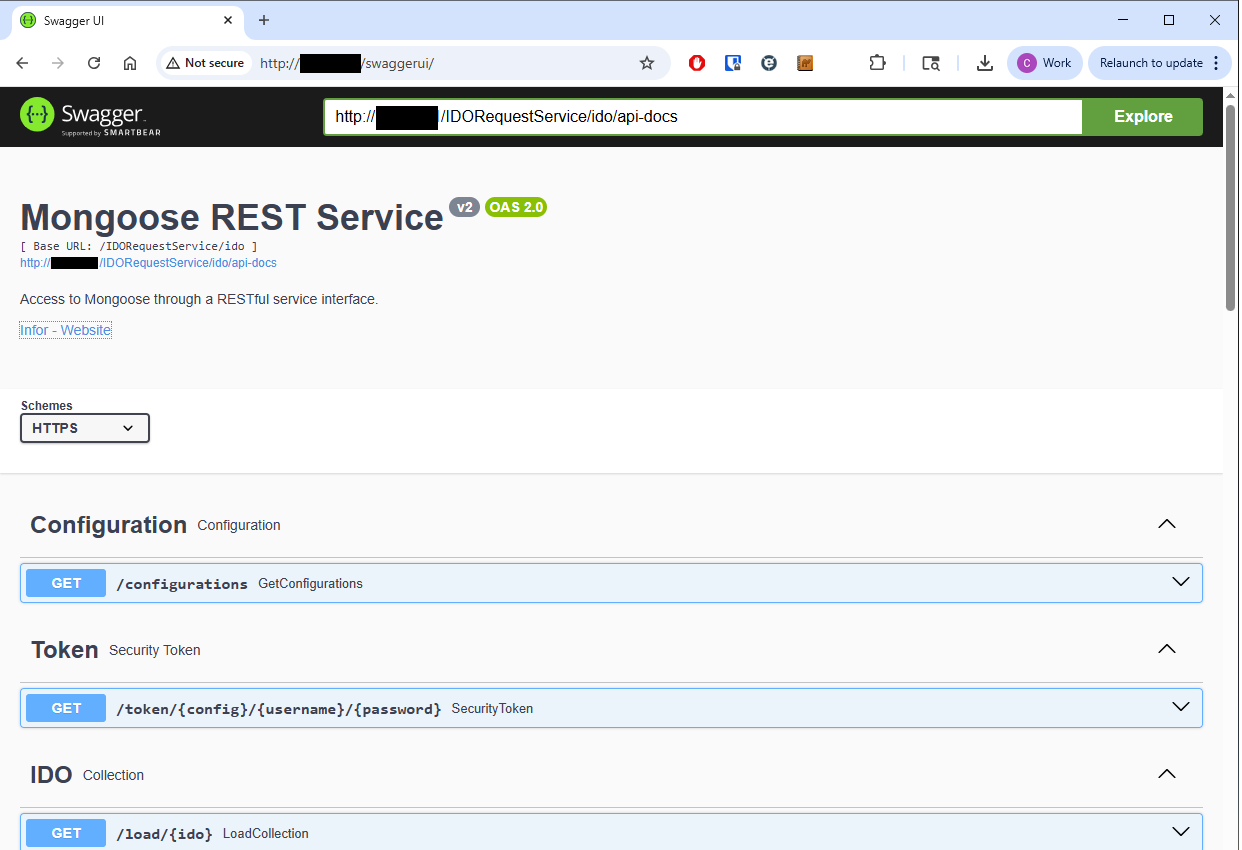
Step 4 — Test
Browse to:
http://<host>/swaggerui/
You should see Swagger UI with either the single spec or the dropdown (depending on your initializer).
- If the UI loads but the spec fails to load: verify the URLs in
swagger-initializer.js. - If you see MIME errors: ensure Static Content is installed and no restrictive
web.configis blocking JS/CSS.
Security Notes
tl;dr - DO NOT INSTALL THIS ON A PUBLIC WEB SERVER! You can add authentication for local environment, and probably should.
- LAN only vs External: If you’ll expose Swagger UI outside your LAN, front Mongoose endpoints with ION API Gateway (OAuth2, policies, rate limits) rather than publishing raw
/IDORequestService/ido/*URLs. - Auth context: Swagger UI will inherit whatever authentication your Mongoose endpoints require. If your IQM site uses Windows Auth/SSO, tests from the server may work differently than remote clients.
- CORS: Hosting Swagger UI on the same host avoids CORS. If you host the UI on a different domain, you may need a reverse proxy or CORS adjustments. CORS is cross-site scripting, bad guys use it and it can be a pain to setup.
Rollback (safe and easy)
This setup is non-intrusive. To roll back:
- Delete the IIS application/virtual directory for
swaggerui. - Optionally delete
C:\inetpub\wwwroot\swaggerui.
No changes were made to the IQM/Mongoose app or its app pool.
No HTTPS?
You really should enable HTTPS. But for testing or very small environments, edit swagger-initializer.js with following code example. Replace host with your server name.
window.onload = function() {
  //<editor-fold desc="Changeable Configuration Block">

  // the following lines will be replaced by docker/configurator, when it runs in a docker-container
window.ui = SwaggerUIBundle({
  url: "http://host/IDORequestService/ido/api-docs/",
  dom_id: '#swagger-ui',
  deepLinking: true,
  presets: [ SwaggerUIBundle.presets.apis, SwaggerUIStandalonePreset ],
  layout: "StandaloneLayout",
  // Override servers after load
  onComplete: function() {
    const spec = window.ui.specSelectors.specJson().toJS();
    if (spec.openapi) {
      spec.servers = [
        { url: "http://host/IDORequestService/ido" },
        { url: "https://host/IDORequestService/ido" }
      ];
    } else {
      spec.schemes = ["http","https"];
    }
    window.ui.specActions.updateJsonSpec(spec);
  }
});


  //</editor-fold>
};
Optional: Scripted Setup (PowerShell)
Adjust the version and paths to taste. Be very cautious as I didn’t thoroughly test this. I only needed to run once. Might nuke this section
$version = "5.29.1" # version at time of writing this
$zipUrl  = "https://github.com/swagger-api/swagger-ui/archive/refs/tags/v$version.zip"
$tmpZip  = "$env:TEMP\swaggerui-$version.zip"
$dest    = "C:\inetpub\wwwroot\swaggerui"

Invoke-WebRequest $zipUrl -OutFile $tmpZip
Expand-Archive $tmpZip -DestinationPath $env:TEMP -Force
$distPath = Join-Path $env:TEMP "swagger-ui-$version\dist"

New-Item -ItemType Directory -Path $dest -Force | Out-Null
Copy-Item -Path (Join-Path $distPath "*") -Destination $dest -Recurse -Force

# Write a minimal initializer that points at the generic Mongoose index
$init = @"
window.ui = SwaggerUIBundle({
  url: "http://<host>/IDORequestService/ido/api-docs/",
  dom_id: '#swagger-ui',
  deepLinking: true,
  presets: [ SwaggerUIBundle.presets.apis, SwaggerUIStandalonePreset ],
  layout: "StandaloneLayout"
});
"@
Set-Content -Path (Join-Path $dest "swagger-initializer.js") -Value $init -Encoding UTF8

Write-Host "Swagger UI files staged in $dest. Create an IIS virtual directory named 'swaggerui' pointing to this folder."
Frequently Asked
Q: /api-docs/ works, but /api-docs/v2/ doesn’t.
A: Generate the REST v2 endpoints with the REST API Wizard in Mongoose (choose the IDOs you need). That process publishes the per-IDO Swagger under /api-docs/v2/….
Q: Can I list multiple IQM specs in one UI?
A: Yes—use the urls: [] array in swagger-initializer.js (see Option B above).
Q: Will this break IQM updates?
A: Nope, Swagger UI lives in a separate folder/app. Removing it is just deleting the app/virtual directory in IIS manager and on disk
See also
- Your IQM/Mongoose API docs:
http://<host>/IDORequestService/ido/api-docs/http://<host>/IDORequestService/ido/api-docs/v2/
- Related: “Infor IQM API – Part 2” style walkthroughs on crafting requests, using REST v2, and publishing. I link to the Infor resources there.