
Meshtastic with Luckfox Lyra Ultra
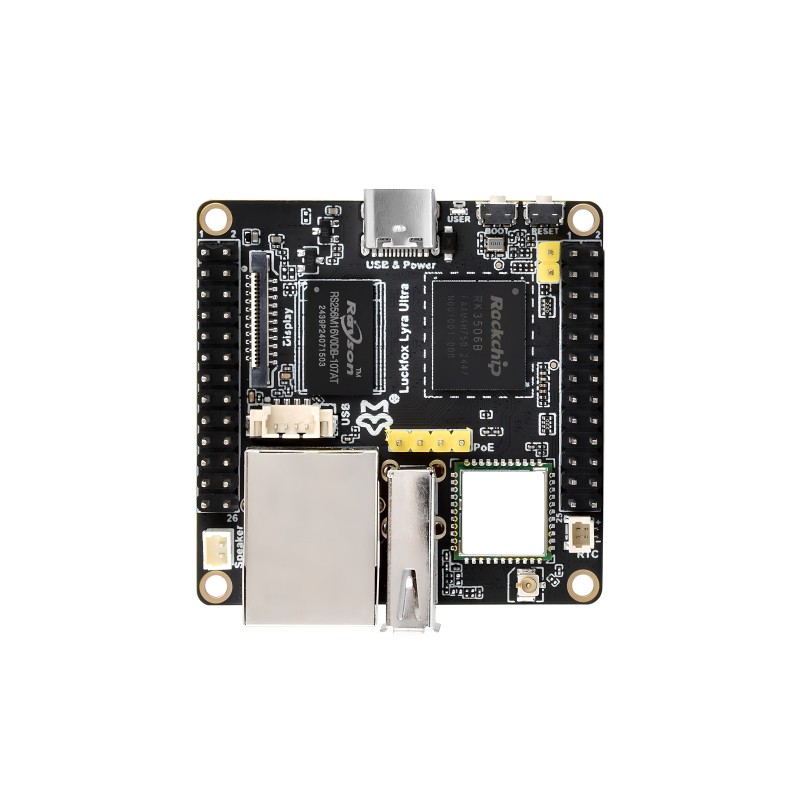
Luckfox Lyra Ultra W
- RK3506B, triple-core ARM Cortex-A7 and ARM Cortex-M0 Processors, 512MB DDR3
- Full USB port and USB-C port
- Onboard 8GB eMMC
- Onboard WiFi and Onboard bluetooth (optional) - 2.4GHz Wi-Fi6 / Bluetooth 5.2 / BLE
- Onboard 100mbps ethernet with optional POE hat
- Supports MIPI interface (2-lane, 22-pin) with a maximum output resolution of 1280x800@60fps
Very nifty board that is very capable and economical. Weight is 0.05 kg (50 grams). Size is roughly 5cm by 5cm by 2cm. It can be powered via USB C or POE. Buy plenty of 2x13 stacking headers, or even better these.
You can buy Lyra directly from Luckfox. You can buy Lyra hats from WeHooper. I recommend the E22P hat. You can look here for additional boards if desired.
Flashing - LOADER in RKDevTool
Special thanks to vid for all his help!
The only downside to the Lyra Ultra is loading the OS. It’s a pain but manageable. Out of the box, it’s somewhat easy. You can find the official instructions here.
Download RK Driver Assistant and RKDevTool. In the config INI file for the RKDevTool, switch language to English before firing up the app.
I recommend mPWRD-OS, with the current version being mPWRD-OS 0.1.0 Alpha. It’s based on Armbian but optimized for meshtastic and theoretically meshcore.
There are two buttons next to the USB C port. The closer one is the BOOT button, the second button further away is the RESET button. Hold down the boot button while plugging in the USB. If you see LOADER, proceed here. If it says NETMASK, skip to resetting the Lyra.
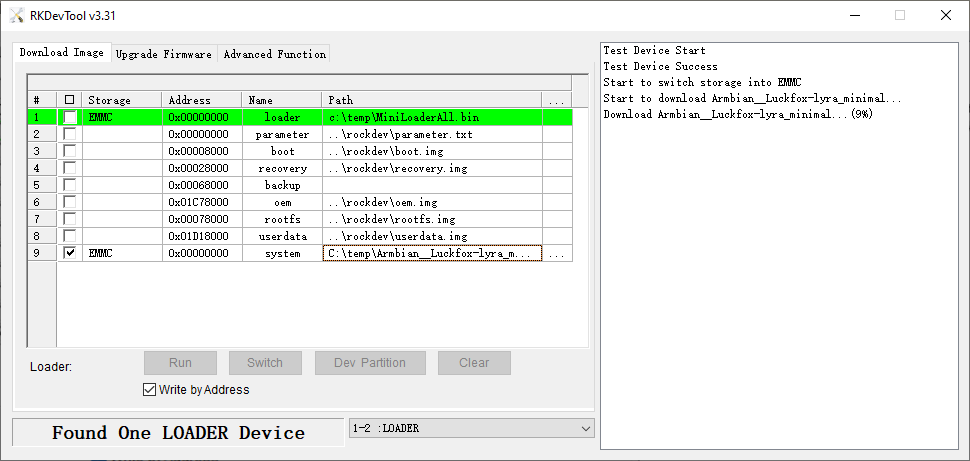
- Right click and add a new entry. Select STORAGE to be EMMC, ADDRESS should default to 0x00000000, set NAME to system, put full path into PATH field
- Hold the boot button (button closest to USB cable, the one that isn’t labelled “RESET”) while plugging in USB
- RKDEVTool should show “LOADER” mode (NOT “MASKROM” mode)
- In the download tab, uncheck everything.
- Check the box for “write by address” and then press “Run”
If successful you’ll see a message like the one on the right. You want to go quickly as the LOADER can timeout. mPWRD-OS should auto-boot and meshtasticd should be reachable with no interaction. I do the initial location via console cable but you can ssh in for that. mpwrd-menu is the command for install and config.
username: root password: 1234
NETMASK - Resetting the Lyra after a bad update
tl;dr - LOADER is weird proprietary partition. Load Luckfox Ubuntu to get that. THEN burn it a second time with your preferred image. Again. LOADER needs a specific boot partition to run. Most OS won’t have that. See below for nerd details.
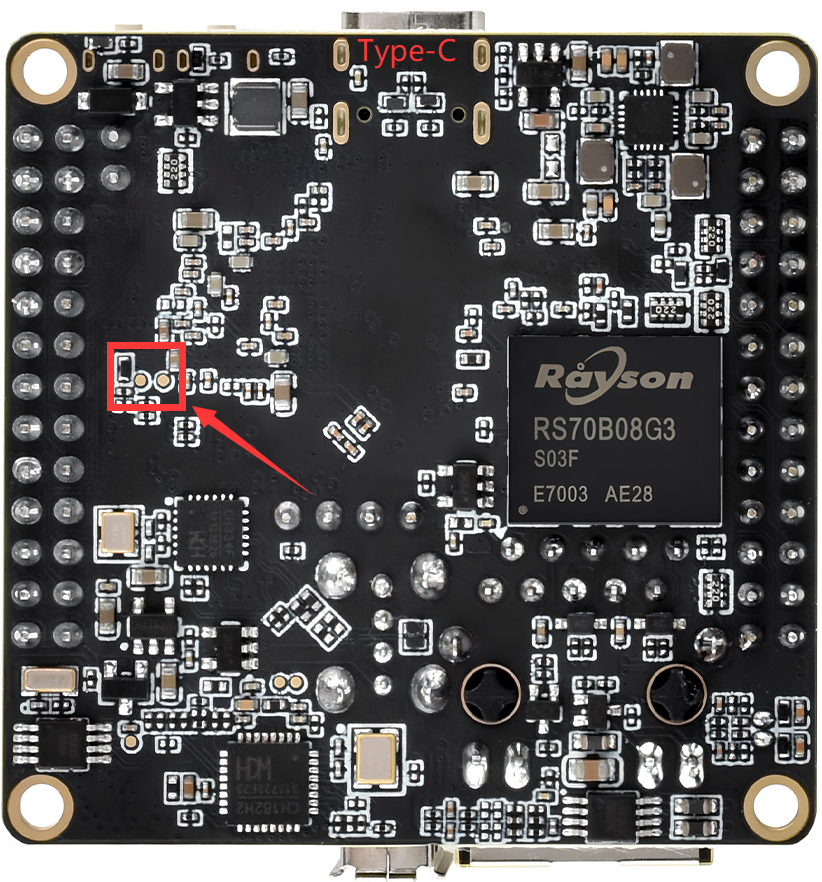
To get into NETMASK, fire up RKDevTool v3.31. Snag a piece of wire or use a set of tweezers, form it into a U, hit the jumper pads while plugging in the USB button. I clipped the wire at 45 degree angle, but tweezers are better if the points are even. You should see MASKROM at the bottom of the RKDevTool once you’re successful. The pads are slightly recessed so it may take a trial or two. Or five.
Once it does show up, go to Upgrade Firmware tab, click on Firmware button. Navigate to the unzipped firmware bundle, select update.img, then hit Upgrade.
Give it a bit after the upgrade is successful, then tap the RESET button while holding down the BOOT button. Once LOADER is displayed, you can then load your other OS using the above instructions.
Connecting to Console via Serial
Handy if your Lyra doesn’t come up via DHCP. It’s not TECHNICALLY needed but a very good idea to know how to console in.
Using a USB to UART TTL cable, connect the following:
Assuming ethernet port oriented down, left hand header, inner row
- GND — MUST be shared with USB-TTL GND (third down)
- TX (board) → connect to RX on USB-TTL (fourth down)
- RX (board) → connect to TX on USB-TTL (fifth down)
Refer to this diagram:
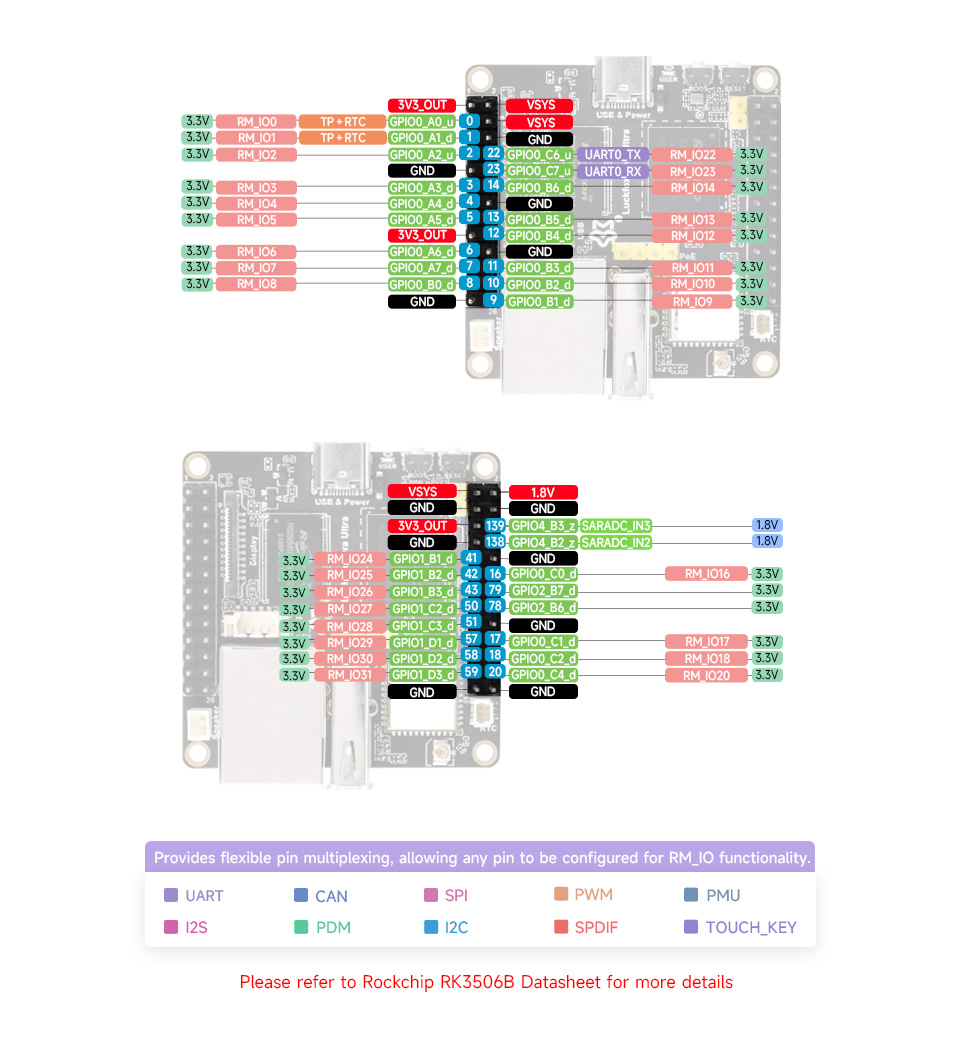
Luckfox RK3506 boards use:
- Baud: 1500000 (not a typo)
- Data: 8
- Parity: N
- Stop: 1
- Flow control: None
Logging in
Plug in POE hat. Connect to POE switch or injector. Check your router to see what IP it has or run a network scan for port 22
SSH in with putty or connect via serial
If using Luckfox Ubuntu: Username: lyra Password: luckfox
If using Armbian: username: root password: 1234
Setup for NON-mPWRD-OS linux OS on Luckfox
Seriously, skip all this and use mPWRD-OS. If you’re hardcore tho, here’s manual setup instructions:
# New system updates
sudo apt update -y
sudo DEBIAN_FRONTEND=noninteractive \
apt-get -y \
  -o Dpkg::Options::="--force-confdef" \
  -o Dpkg::Options::="--force-confold" \
  dist-upgrade

# Meshtastic install
sudo apt install software-properties-common -y
sudo add-apt-repository ppa:meshtastic/beta
sudo apt update -y
sudo apt install meshtasticd i2c-tools -y
sudo apt install pipx -y && pipx install "meshtastic[cli]"
pipx ensurepath


# Enable SPI
# 1 Advanced Options -> 4 SPI -> (enter)  -> 1 Enable
sudo luckfox-config


# Set SPI pins
sudo nano /etc/luckfox.cfg
# use pins from below

# Add these uncommented lines to /etc/luckfox.conf
# Settings
#SPI0_STATUS=1
#SPI0_SPEED=20000000
#SPI0_SCLK_RM_IO=8
#SPI0_MISO_RM_IO=7
#SPI0_MOSI_RM_IO=6
#SPI0_CS_RM_IO=10

# reboot

# Turns on auto-discovery
sudo apt install avahi-daemon
sudo tee /etc/avahi/services/meshtastic.service > /dev/null <<'EOF'
<?xml version="1.0" standalone="no"?><!--*-nxml-*-->
<!DOCTYPE service-group SYSTEM "avahi-service.dtd">
<service-group>
    <name>Meshtastic</name>
    <service protocol="ipv4">
        <type>_meshtastic._tcp</type>
        <port>4403</port>
    </service>
</service-group>
EOF
sudo systemctl enable avahi-daemon && sudo systemctl start avahi-daemon


# Rename the machine

echo "KD3BQB-LF-NodeXX" | sudo tee /etc/hostname
sudo tee /etc/hosts >/dev/null <<'EOF'
127.0.0.1   localhost
127.0.1.1   KD3BQB-LF-NodeXX
EOF

# reboot
# sudo reboot

# Get config file
cd /etc/meshtasticd/config.d/
wget -O /etc/meshtasticd/config.d/lyra_ultra_hat_1W.yaml https://github.com/wehooper4/Meshtastic-Hardware/raw/refs/heads/main/Luckfox%20Ultra%20Hat/lyra_ultra_hat_1W.yaml
# wget -O /etc/meshtasticd/config.d/lyra_ultra_hat_2W.yaml https://github.com/wehooper4/Meshtastic-Hardware/raw/refs/heads/main/Luckfox%20Ultra%20Hat/lyra_ultra_hat_2W.yaml
# If using E22P, use 1W config file and just set power level to 18. Won't burn itself up, but won't give you more dbm
# If you have problems below such as "No sx1262 radio", try uncommenting the CS line

# uncomment eth0 or set your MACAddressSource
sudo nano /etc/meshtasticd/config.yaml
# Fire up meshtasticd
sudo systemctl enable meshtasticd && sudo systemctl start meshtasticd

# Meshtastic CLI
meshtastic --host --set lora.region "US"
meshtastic --host --set-owner "SUSQ VAL PA Mesh - Town - Tower"
meshtastic --host --set-owner-short "SVMI"
meshtastic --host  --export-config | grep "Key:"
Edit config.yaml to set MAC (use MACAddressSource eth0) and node limits (100-200).
Troubleshoot with journalctl -xeu meshtasticd.service or run meshtasticd manually.
Configure through the Meshtastic app. Use the Network option on the Cloud tab in the app.
WiFi
Lyra Ultra W has WiFi built in and mPWRD-OS should have it running. Check by running ‘ip link show’ and making sure wlan0 is there
Adding WiFi network manually
sudo nmcli connection add type wifi ifname wlan0 con-name mywifi ssid "SSID_NAME"
sudo nmcli connection modify mywifi wifi-sec.key-mgmt wpa-psk
sudo nmcli connection modify mywifi wifi-sec.psk "YOUR_PASSWORD"
sudo nmcli connection modify mywifi connection.autoconnect yes
Setting up AP mode
Save to setup-ap.sh and run sudo bash ./setup-ap.sh
#!/bin/bash
# Simple AP setup script for Debian
# Run as root

### CONFIGURATION ###
AP_SSID="MyAccessPoint"
AP_PASSWORD="SuperSecret123"
WLAN_IF="wlan0"
AP_IP="192.168.50.1"
DHCP_RANGE_START="192.168.50.10"
DHCP_RANGE_END="192.168.50.200"
UPLINK_IF="eth0"   # or wwan0 if you want to NAT to LTE
####################

set -e

echo "[*] Installing required packages..."
sudo apt -o Acquire::ForceIPv4=true update
sudo apt -o Acquire::ForceIPv4=true install -y hostapd dnsmasq iptables-persistent ifupdown

echo "[*] Stopping services until configured..."
systemctl stop hostapd || true
systemctl stop dnsmasq || true

echo "[*] Configuring static IP on $WLAN_IF..."
cat >/etc/network/interfaces.d/$WLAN_IF <<EOF
auto $WLAN_IF
iface $WLAN_IF inet static
    address $AP_IP
    netmask 255.255.255.0
EOF
ifdown $WLAN_IF || true
ifup $WLAN_IF

echo "[*] Configuring dnsmasq..."
mv /etc/dnsmasq.conf /etc/dnsmasq.conf.orig.$(date +%s) || true
cat >/etc/dnsmasq.conf <<EOF
interface=$WLAN_IF
dhcp-range=$DHCP_RANGE_START,$DHCP_RANGE_END,255.255.255.0,24h
EOF

echo "[*] Configuring hostapd..."
cat >/etc/hostapd/hostapd.conf <<EOF
interface=$WLAN_IF
driver=nl80211
ssid=$AP_SSID
hw_mode=g
channel=6
wmm_enabled=1
auth_algs=1
ignore_broadcast_ssid=0
wpa=2
wpa_passphrase=$AP_PASSWORD
wpa_key_mgmt=WPA-PSK
rsn_pairwise=CCMP
EOF

# Point hostapd to config
sed -i "s|^#DAEMON_CONF=.*|DAEMON_CONF=\"/etc/hostapd/hostapd.conf\"|" /etc/default/hostapd

echo "[*] Enabling IP forwarding..."
sed -i 's/^#\?net.ipv4.ip_forward.*/net.ipv4.ip_forward=1/' /etc/sysctl.conf
sysctl -p

echo "[*] Setting up NAT to $UPLINK_IF..."
iptables -t nat -A POSTROUTING -o $UPLINK_IF -j MASQUERADE
iptables -A FORWARD -i $UPLINK_IF -o $WLAN_IF -m state --state RELATED,ESTABLISHED -j ACCEPT
iptables -A FORWARD -i $WLAN_IF -o $UPLINK_IF -j ACCEPT
netfilter-persistent save

echo "[*] Enabling services..."
systemctl unmask hostapd
systemctl enable hostapd
systemctl enable dnsmasq
systemctl restart hostapd
systemctl restart dnsmasq

echo "[+] Access Point setup complete!"
echo "    SSID: $AP_SSID"
echo "    Password: $AP_PASSWORD"
echo "    Interface: $WLAN_IF ($AP_IP)"
Reliability
To auto-restart Meshtastic and reboot weekly:
sudo tee /usr/local/bin/check_meshtasticd.sh > /dev/null <<'EOF'
#!/bin/bash
SERVICE="meshtasticd"
if ! pgrep -x "$SERVICE" > /dev/null; then
    echo "$(date): $SERVICE not running, restarting..." >> /var/log/meshtasticd_monitor.log
    systemctl restart $SERVICE
fi
EOF
sudo chmod +x /usr/local/bin/check_meshtasticd.sh
sudo crontab -e
# 0 * * * * /usr/local/bin/check_meshtasticd.sh
# 0 1 * * 1 /sbin/reboot
If you’re not very experienced with Linux, remember to log in every so often to run updates. You can automate that as well.
Remote Access
If you use Mark’s Ubuntu image, it may not have TUN service built into the kernel and it won’t work. If you use Luckfox community Ubuntu image, not sure yet. Will test it. If you use Armbian/mPWRD-OS, it should.
sudo apt install curl
curl -fsSL https://tailscale.com/install.sh | sh
sudo tailscale up
Copy URL to web browser.
Once you have tailscale installed, you can also install tailscale on your phone and use the Meshtastic app to connect to your node from anywhere in the world.
Power consumption
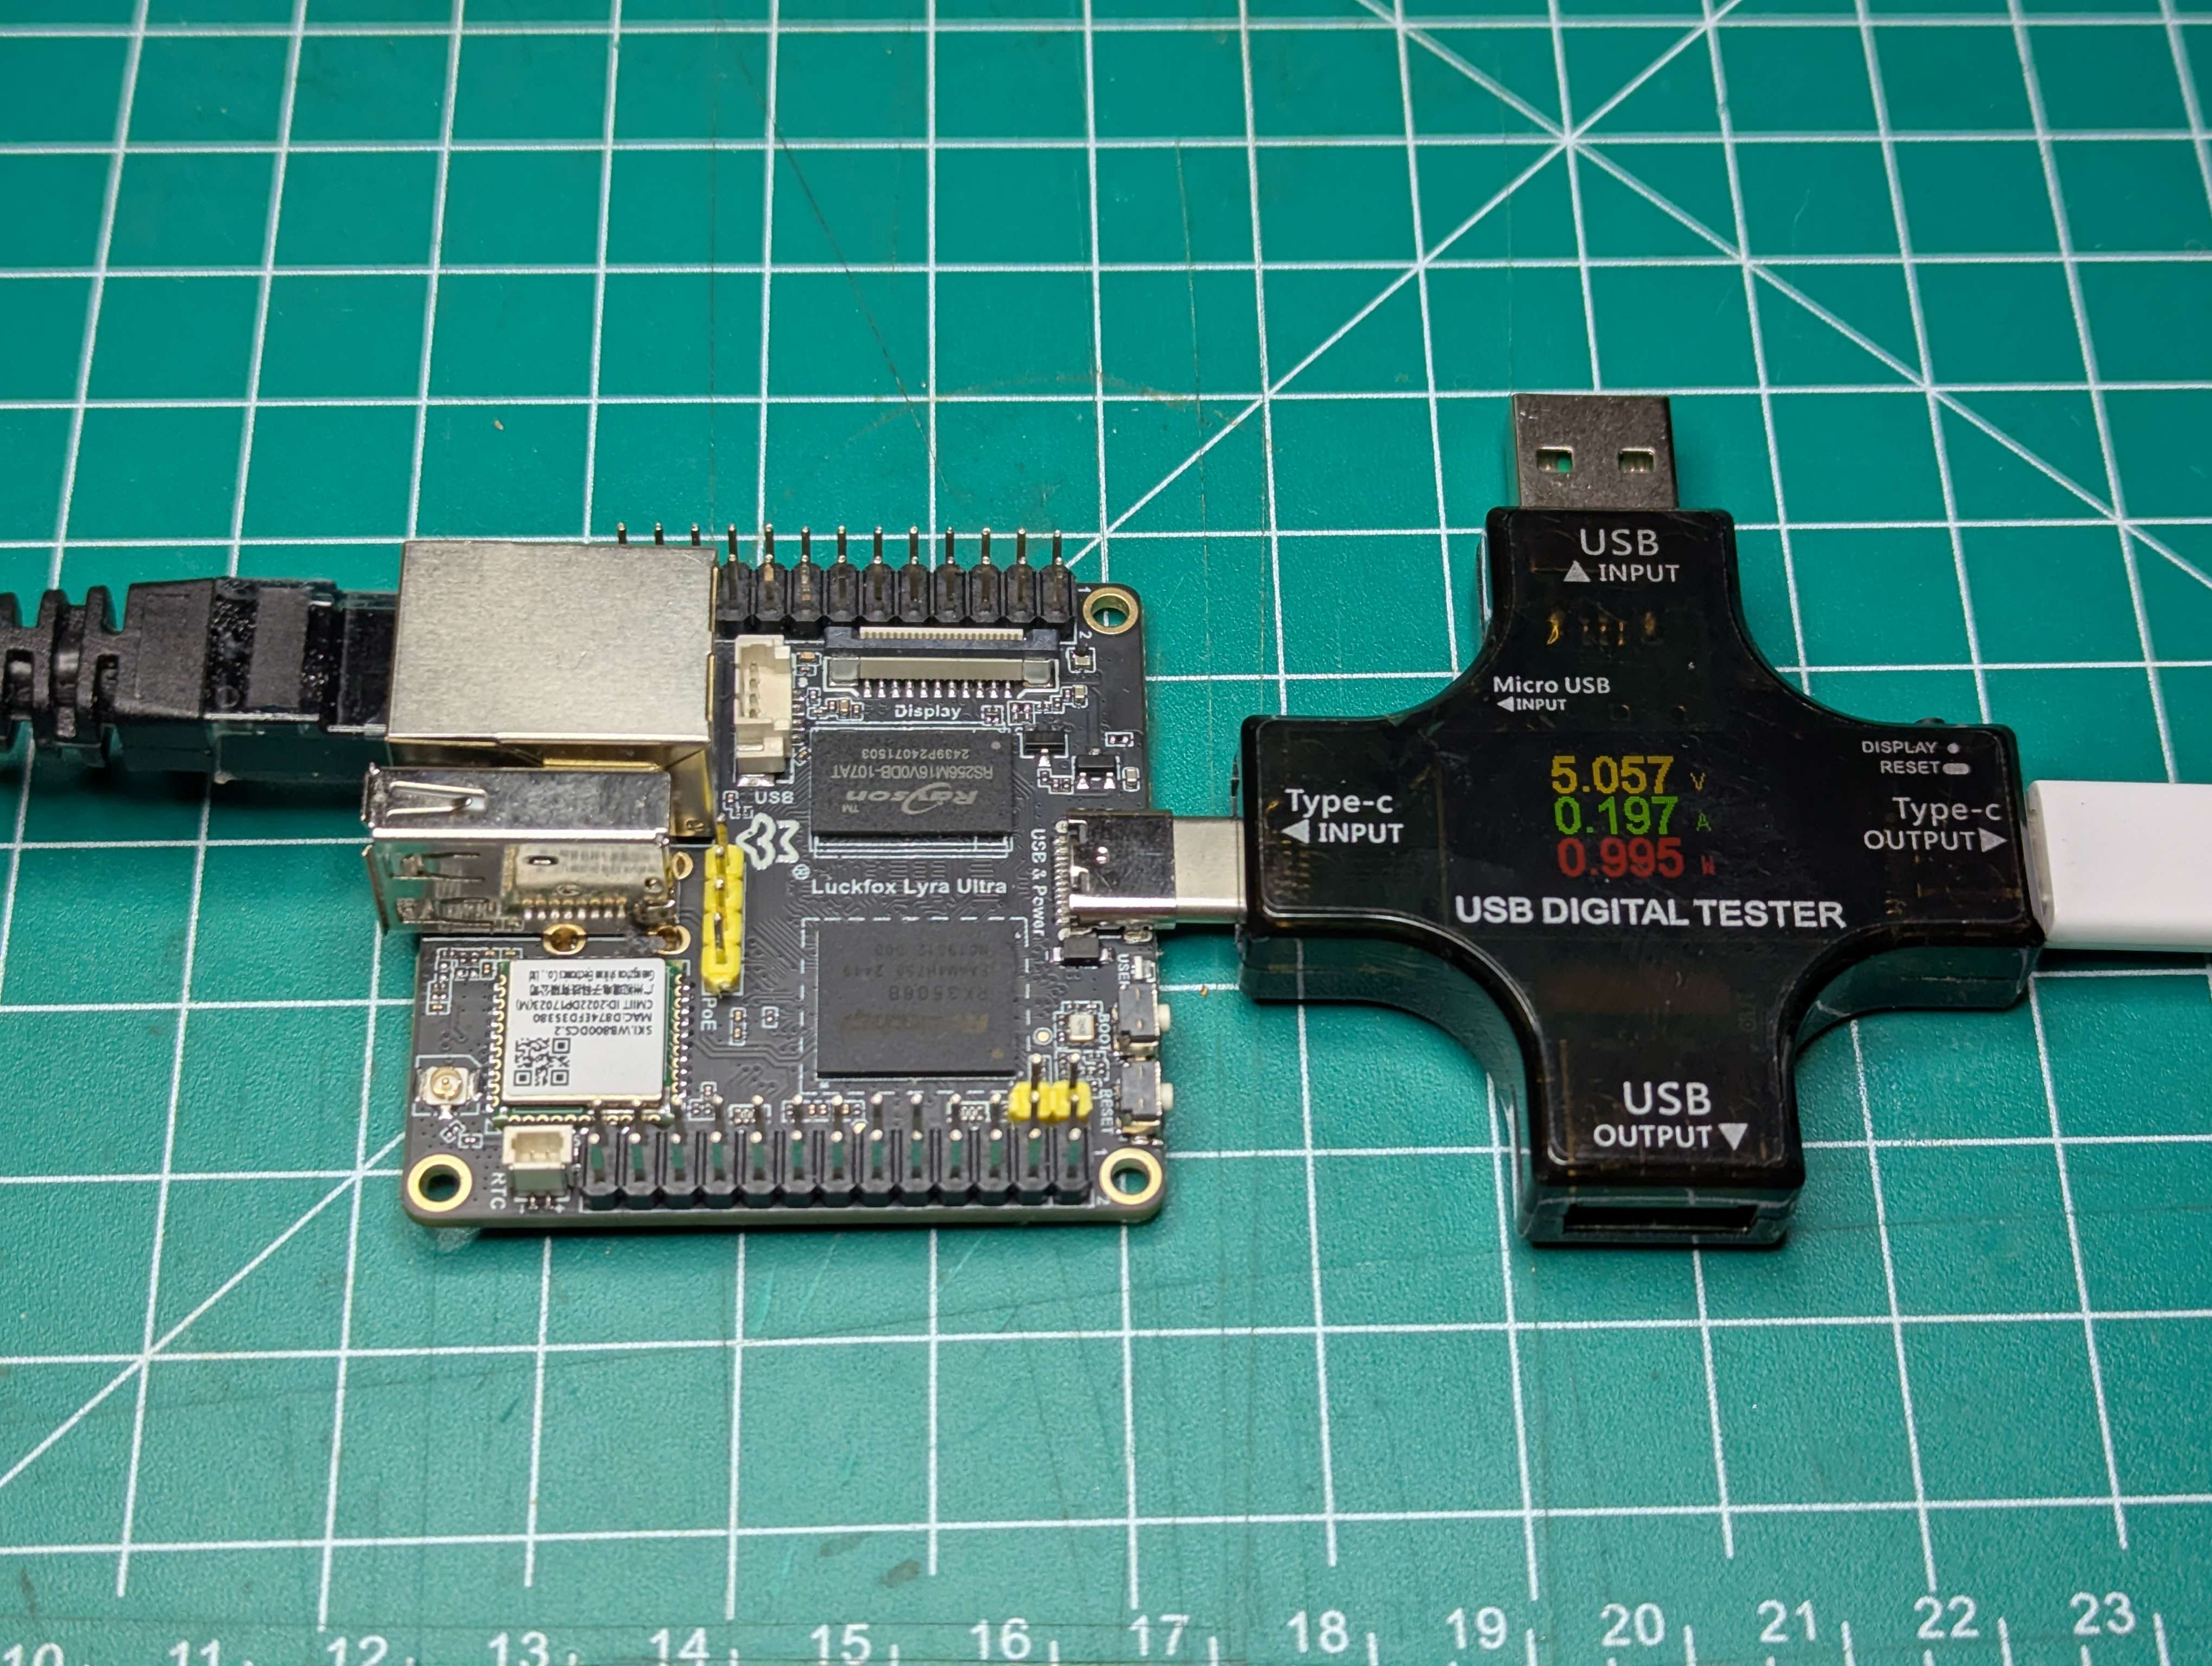
With no hat:
- USB - 1W, 0.2A, 5V
- POE - 1.5W, 27 mA. Switch is pushing at 54-56V.
Backboards for Lyra
TODO STLs and laser files
LOADER Partition Details
Tower Hardware
Nebra case can be purchased for $15 or less. Shipping is the expensive part. In smaller quantities, it makes sense to buy same case from Aliexpress.
For smaller builds, I’m experimenting with smaller cases.
Nebra Strut, reach out to Mark for a quote. Should be $40-50 ish if buying a bunch
13 or 23 inch strut Angle iron on both ends For the arm: one arm, centered on both sides centering on enclosure side keeps from interferring with antennas on either side of enclosure. Centering on tower side is just for ease of shipping/storage. If you think it’s an issue, can go towards one side On the enclosure side: flat side out 9 inches long angle iron (just slightly shorter than the case) two mounting holes, centered width wise, 5/16 holes, 7.5 inches apart (190mm preferably) On tower side: 9 inches long angle iron two 1.5 inch U-bolts (change this depending on your tower) We’re also looking as gusset brackets for longer lifespan. It’s meant to be cheap but strong enough. Not interfere with antennas, just long enough to minimize tower shadow and interference, etc. You’ll need two M6 bolts and washets. I recommend metal banding the case to the strut, mostly to minimize amount of force on the bolts.